Showing posts with label Dinner Recipes. Show all posts

Tuesday, August 26, 2014

Chicken Parmesan Meatballs

Thomas and I love love love Italian food.  And out of all of the Italian foods that exist, we really really love chicken parm.  So when I saw this recipe for Chicken Parmesan Meatballs on Pinterest, I just knew I had to make them.


And boy, did they live up to my expectations!  They were delicious!  We served them we some pasta and marinara sauce, a fresh salad, and some garlic bread!  Yum yum!


Chicken Parmesan Meatballs
Adapted from: Bake Your Day
Makes: approximately 24

Ingredients:
1 pound ground chicken
1/2 cup Italian breadcrumbs
3/4 cup freshly grated Parmesan Cheese
1 teaspoon garlic salt
1 tablespoon tomato paste
1 teaspoon Italian seasoning
2 teaspoon oregano
1 teaspoon crushed red pepper flakes
1 teaspoon parsley 
1/2 teaspoon salt
1/2 teaspoon pepper
Marinara sauce for serving
Your favorite pasta noodles for serving

Directions:
  1. Heat the oven to 375 degrees and spray a 9x13 rimmed baking sheet with cooking spray.
  2. Mix all of the  ingredients (except pasta sauce and noodles) in a large bowl until combined. I really got in there with my hands.  But beware, it's really cold.
  3. Scoop the mixture out and roll into 1-inch balls and place them on the prepared baking sheet. 
  4. Bake in the 375 degree oven for about 20 minutes until golden brown and the chicken is cooked through. The center of the meatball should read 165-170 degrees.
  5. Serve with pasta and sauce and a fresh salad!
***Freezing Note:  I made the meatballs and then froze the leftovers.  On the day we wanted to eat the leftovers, I thawed the meatballs briefly and then stuck them in the oven for about 15 minutes to warm up again, and they turned out great the second time too!

I hope you enjoy!

Friday, April 25, 2014

Thin Crust Pizza


Today let's talk thin crust pizza.

If you don't love it, we can't be friends.  We just can't.

Though I am a huge sucker for a really good quality piece of a Sicilian pizza, thin crust will always be my tummy's favorite.  Always.

I am really not a huge fan of pan pizzas.  Especially chain pizza place ones.  Yuck.  They're just so tough.  And don't even get me started on stuffed crust pizzas.  Double yuck.

But anyway, thin crust pizza calls to my heart... or... stomach actually.

Until very recently, I had not branched out in my pizza crust recipe.  Growing up, we had homemade pizzas once every week or two.  Usually on Friday family movie nights.  And my mom's crust recipe is great.  And I grew up with it.  Why fix something that's not broken, right?!

But then Pinterest comes along and entices me with beautiful photos promising the loveliest crust of all time.  So I've recently tried some new recipes.  All of which are good.  Not many that wow me.  But here is one of the few that did.

Thin. Crust. Pizza.  Genuine, paper-thin, crispy, "Imo's"-like pizza crust.  Oh yummy!  There are just a few things that I miss about St. Louis, and Imo's Pizza is one of them.  So many nights in college, watching out the window of Thomas' dorm room while he walked across the street in the cold/snow to pick up our extra large, thin crust, pepperoni and green olive pizza.  Salivating...

This pizza may not taste just like Imo's because apparently nobody knows what provel cheese is once you cross out of the St. Louis area, but it's pretty darn close.

And the one thing (besides the super thin crust) that sends this pizza over the top: the Italian seasoning.  Just shake some on top of everything right before you stick the pizza in the oven and wow, it completely takes the pizza to the next level.  DO NOT forget that step!

Oh!  And the other other thing that makes this pizza totally awesome: the dough doesn't need to rise, so you can make these from start to finish in about 30 minutes!  It's definitely worth a try for that fact alone!

Now without further ado:


Thin Crust Pizza
Adapted from: Cinnamon Spice and Everything Nice
Makes: two 12 inch pizzas
Feeds: 2-4 people (The thin crust makes these pizzas seem not quite as filling as traditional crusts.)

Ingredients:
Scant 2 cups all-purpose flour
1 tablespoon baking powder
1/2 teaspoon salt
2 tablespoons canola/vegetable/olive oil
1/2 cup water
1 cup pizza sauce
+/-3 cups cheese (traditionally mozzarella, but feel free to branch out)
You choice of toppings
Italian seasoning

Directions:
  1. Preheat the oven to 425 degrees.  Spray two pizza pans with cooking spray.  (You can use cookie sheets, but I highly suggest pizza pans to make the crust crunchier.)
  2. Combine the dry ingredients in a mixing bowl, and give them a quick toss.
  3. Add the oil and water, mix until a shaggy dough forms.  You will have to get in there with your hands and press the dough together.  Add a tiny bit more water if the dough won't hold together.
  4. Separate the dough into two portions, and form them into small disks.  The rounder the disks are, the better-shaped your pizzas will be.  Wrap each disk in saran wrap and let rest for 10 minutes.
  5. Spray a piece of wax paper with cooking spray.  Unwrap a disk of dough and lay it on the wax paper.  Then cover with another sheet of sprayed wax paper.  (I just use one big long piece and fold it in half.)  Roll into a 12 inch, very flat crust. (This will take a lot of arm strength.  Just keep rolling.)
  6. Place the dough on your sprayed pizza pan, cover with approximately 1/2 cup pizza sauce, your choice of toppings, and cheese.
  7. Sprinkle the top of the pizza with Italian seasoning.
  8. Bake for 9-12 minutes, until the cheese starts to brown.  Once it's out of the oven, i
    f you're using a traditional baking sheet, I suggest sliding the pizza onto a wire rack to cool.  This helps it stay crunchy instead of turning soggy.
  9. Repeat for second disk of dough.
  10. Enjoy!
Oh!  I love this pizza!  I hope you do too!

Wednesday, March 26, 2014

Copycat Five Cheese Ziti from Olive Garden

Today's recipe could not be more of a win if it tried!  I found this recipe via Pinterest several months ago, and since then it has become a favorite staple in our house.


I love it for so many reasons!
  1. It really does taste almost exactly like Olive Garden's Five Cheese Ziti (my favorite)!
  2. It is so incredibly easy to make.
  3. It's almost better as leftovers (which I hardly ever say about ANYTHING).
  4. It's amazing.
  5. It's delicious.
  6. It's super easy.
  7. Did I mention it was easy to make?!
Seriously, if your family likes pasta, this is a MUST-TRY!

The mixture of sauces is incredibly creamy and the blend of cheeses make this dish rich and flavorful!  Oh so yum!  One of my main suggestions is to buy a sauce that you know has good flavor.  The sauce is one of the main ingredients in this meal, so if you buy tasteless sauce, it will definitely affect the pasta.  I absolutely love Prego Mushroom for the red sauce and Classico Light Asiago Romano for the alfredo.


Five Cheese Ziti
An Olive Garden Copycat Recipe
Adapted from: Pearls, Handcuffs, and Happy Hour
Servings: 6-8
*Optional:  I like to throw all the ingredients together in the morning and leave it in the fridge all day so that all of the flavors start to meld together.  This is not required, but a very delicious option.  Then, I just have to pop it in the oven when dinnertime rolls around.

Ingredients:
1/2 pound penne pasta
1 1/2 cups marinara sauce (I like Prego Mushroom.)
1 cup alfredo sauce (Our fave is Classico Light Asiago Romano.  It's got a lot less fat than the originals and it has a really nice flavor.)
1 cup shredded mozzarella cheese
1/2 cup parmesan cheese


Directions:
  1. Boil the pasta noodles as per the instructions on the box.
  2. Meanwhile, mix the sauces and cheeses in a large bowl.
  3. Once the pasta is cooked, rinse and drain it a few times to cool it off a little.
  4. When it has been drained well, pour the pasta into the sauce/cheese mixture and stir until everything is mixed together.
  5. Pour into a glass pie dish or an oven-safe bowl (like a Pyrex).  
  6. *Optional: Cover and place in the fridge until ready to bake.
  7. Preheat the oven to 350 degrees.
  8. Cover pan with aluminum foil.  Bake for about 30 minutes, stirring once or twice during the baking process.
  9. Let cool for a few minutes before serving.
Enjoy!!!  We absolutely love this meal, especially because Five Cheese Ziti is one of our favorite meals at Olive Garden.  I hope your family likes it too!

Wednesday, March 19, 2014

Meatball Sliders {Wednesday Wins}


We recently had these meatball sliders for dinner, and o my goodness, they were delicious!  These are perfect for dinner with a fresh salad.  The meatballs are stuffed with Italian seasoning goodness.  And the Italian bread rolls go perfectly.  Top them off with a little mozzarella and Parmesan and you've got a great Italian dinner!


They'd also be just as perfect for a potluck party!  You can make the meatballs and rolls smaller if you'd like to feed more people.  To keep the meatballs and sauce warm, just pop them in a crock pot after they've been cooked.  They'll be welcome at any occasion!


I just used my mom's recipes for both the meatballs and the Italian bread and tweaked them both a bit to work for this meal!

Italian Rolls
Adapted from: My Mom's "Mess Up" bread 
Makes: 12 rolls
 
Ingredients:
3/4 cup warm water
1/2 tablespoon margarine, softened
1/2 tablespoon oil
2 cups + 2 tablespoons bread flour
2 1/4 teaspoons sugar 
3/4 teaspoon salt
1 teaspoon yeast
butter, for greasing
 
Directions: *If you have a bread maker, just put all the ingredients in your bread maker and set for dough.  This should take care of all of the kneading and the first rise, so you can start at step 7. For those of you that don't have a bread machine:
  1. Add yeast to warm water and stir.
  2. Put 1 cup flour, the salt, and the sugar in a large bowl, add water and yeast; mix thoroughly for 2 minutes.
  3. Add oil and margarine; mix thoroughly for 2 minutes.
  4. Add remaining flour until dough is firm, but still elastic.
  5. Knead on a floured surface for 5 minutes.
  6. Place into a well-greased bowl.  Cover and let rise for 1 hour.
  7. Grease a 7x11 pan with butter.
  8. Divide dough into twelve rolls and shape into balls as best as possible.  Place the rolls into the pan.
  9. Cover and let rise in a warm place for 1 hour.  (While the rolls are rising and baking, you can prepare the meatballs.)
  10. Bake at 375 degrees for 25-40 minutes until nice and golden brown.

Meatballs
Adapted from: My mom
Makes: 12
Ingredients: 
1/2 pound ground beef
1/2 pound Italian sausage
1/4 cup milk
1 beaten egg
3/4 cup Italian bread crumbs
1 teaspoon Italian seasoning
1 teaspoon salt 
2 tablespoons Parmesan cheese
1-2 cups marinara sauce
 
Directions:
  1. Combine eggs, milk, Italian seasoning, salt, and Parmesan in a large bowl.
  2. Add enough breadcrumbs to make a ball.
  3. Add meat and mix well.  Beware, the best way to do this is with your hands, but they will get really, really cold!
  4. Roll into 2 inch balls.  Adjust the sizes so that you end up with 12 large meatballs.
  5. Place in a skillet and brown slowly on a low heat, stirring often.
  6. Drain on a paper towel.
  7. Cover with your favorite marinara sauce. 
Once the rolls are out of the oven and the meatballs and sauce are warm, split a roll, place a meatball covered in sauce in the middle and cover with some mozzarella and Parmesan cheeses.  Chow down!

I hope you enjoy this delicious dinner!

Saturday, March 15, 2014

Loaded Baked Mashed Potatoes

This side dish comes straight from my mom.  And before that, I'm pretty sure she got it from heaven!  These potatoes are absolutely perfect!  Combining the best of both loaded baked potatoes and mashed potatoes, you can not go wrong with these!

Of course, it takes some old-fashioned elbow grease to get the perfect lump-free mashed potatoes.  My dad usually mashes the potatoes at my parents house.  And he is a boss at it.  By the time he's done mashing, those potatoes couldn't form a lump if they wanted to.  They're perfectly creamy.  It's delightful.

So, before I drool all over my computer, I'm going to type out the recipe and finish this post!


Loaded Baked Mashed Potatoes
From: My Mom
Serves: 4-6
**Note: All of the amounts in this recipe are estimated.  Start with the smaller amount and keep adding and tasting until you create the perfect flavor for your family.

Ingredients:
4-6 medium baking potatoes
4-6 ounces cream cheese
1/3 - 1/2 cup sour cream
4-6 tablespoons butter
salt and pepper
1/4 teaspoon garlic salt
1/3 cup cheese
1/4 cup bacon bits

Directions:
  1. Peel the potatoes and cut into small chunks.  Boil in a large pot until potatoes are soft and break apart when stuck with a fork.  Drain water.
  2.  Starting with the smaller amounts add cream cheese, sour cream, and butter.  Mash really, really well.
  3. Add garlic salt and salt and pepper to taste.  Continue stirring/mashing.  Taste and add more of anything as desired.
  4. Add cheese and bacon bits; stir.  The potatoes can now be served, however if you want to prepare them early, or if they need heating up again, continue to step 5.
  5. Place in a 350 degree oven for about 30 minutes.
You can enjoy these delicious potatoes as a side dish to just about anything.  These are a holiday staple at my parents' house, and we wouldn't have it any other way!

Thursday, March 13, 2014

Meatless Meals

**I'm a little low on recipes to blog this week, because I'm currently in the middle of a "No Dessert Week".  Meaning that I'm trying not to make or eat dessert after dinner this week.  This was a spur of the moment thing on Sunday night, because Thomas is trying to lose just a few more pounds and I could certainly do without a few too.  But, I didn't plan a super interesting menu for this week, so I'm slacking on having a recipe to blog.  I will try and come up with something in the next few days though.  In the mean time, here is a more general food post!


Whether you're on a budget or just looking for a little more variety in your menus, trying out some meatless meals could be just what you need!  Thomas and I try to eat meatless at least once a week.  It's nice on the budget and great to change things up.  We eat a lot of chicken around here, so rather than having to splurge on steaks, we go meatless.

The thing about trying meatless meals if you haven't is that you feel like you're going to notice it missing from your plate.  But if you plan it right, you'll see that you don't really miss the meat.  You just have to make sure that you have plenty of variety on your plate to keep you interested.

Now, if you're a picky eater out there, these are definitely some meals you will like.  Thomas is pretty darn picky about some things, and there are certainly foods I won't eat also.  So there's nothing "new age" in here like quinoa or tofu or chickpeas.  We're a little more basic than that.

So, without further ado, here are some really basic meatless meals.

Pasta:  This is probably the easiest type of meal to go meatless on.  You can easily make almost any type of pasta without meat.  One of Thomas' and my go-to meals is basically spaghetti with cheese in the marinara sauce instead of meat.  It's super easy to just mix some cheese into your sauce when you would use meat.  The cheese takes the sauce to a whole new level, so you really don't even notice the meat missing.  Serve any pasta with a salad and some garlic bread, and you've got a great, balanced meal.
Try this delicious homemade lasagna without meat.  There are so many layers of flavor that it doesn't even really need meat.
These stuffed shells are also a great way to skip the meat with pasta.

Potatoes:  Potatoes are so versatile that you can easily take them from a side dish to the main course.  Here are some ideas:
Loaded Baked Potatoes.  Serve with some cooked veggies or big salad and some bread or rolls.
Potato Soup:  Just Google it, and you'll find tons of recipes for all different kinds of potato soups.  Even Loaded Baked Potato Soup!


Veggie Soup:  I've got a great, super easy recipe for Veggie Soup right here.  Just omit the meat, and you've still got a flavorful, hearty meal!

Pizza:  This is another really easy one.  You can do any pizza meatless.  Sure, it's a little more boring that way, but it's still a great meal.  One of my favorite lunch meals is French Bread pizza.  Just cut yourself a few slices of your favorite French bread and fix each piece like a mini pizza.  It's delicious and super quick.  They only need about 10-15 minutes to bake.  These are also great for families because each person can be responsible for making their pizza however they want.  Kids love getting to put on their own toppings and have their very own pizza.

And as you've probably noticed:  serve everything with a salad and some type of bread!  I just love salad and bread to complete a meal!  Enjoy!

Thursday, January 9, 2014

Chicken and Dumplings: A Cold Weather Classic

Ok, so the cat just took about an hour long nap on my lap (only ended by the fact that I absolutely HAD to go to the bathroom), and now I'm exhausted.  Sitting on the couch for too long in the afternoon just kills me.  It's not that it's not relaxing, it's just that if I sit there too long, my body seems to shut down for the rest of the day.  Bleh.  She was adorable though!  And I'd still be sitting there right now if my bladder hadn't been bursting.  To me, there is just this unspoken rule that if your cat comes to lay with/on you, you don't move until the cat has vacated her spot.  That's just how it works.  You sit there, legs asleep, overheated, bored to death, moving as little as humanly possible until she decides to move.  That's just the rule.  Lol.  (FYI, I know I sound ridiculous.)

Anyway, today I figured I would share a recipe!  Since it's (probably) cold where ever you are right now, this meal is perfect!  I absolutely love chicken and dumplings.  Any time we eat at Cracker Barrel, it is positively the hardest decision in the world to choose between their chicken and dumplings or a breakfast meal.  Talk about tough!

This recipe is very similar to Cracker Barrel's version.  The dumplings are flat, but delicious, and the dish is interspersed with shredded chicken.  (In my humble opinion, this meal would be even better if you just left out the chicken all together, but I know we need some protein to balance it out.) 

Also, just FYI, I made half of the recipe below for just Thomas and I, and we had about 2 servings of leftovers too.

Chicken and Dumplings
Adapted from: Buns in My Oven
Serves: 6-8 people

Ingredients:
  • 3-4 medium chicken breasts (depends on how much chicken you want in it)
  • 6 cups chicken broth (I used boiling water and chicken bouillon cubes.)
  • 3 cups flour
  • 3/4 teaspoon baking soda
  • 3/4 teaspoon salt
  • 4 1/2 tablespoons butter or margarine
  • 1 cup milk
  • Salt and Pepper to taste
Directions:
  1. Cook the chicken, then let cool and shred.  (I just boil it because it will get seasoned when you add everything together, but you can cook it anyway you'd like.) 
  2. While the chicken is cooking, you can prepare the dumplings.  Mix the flour, baking soda, and salt in a large bowl.
  3. Cut in the butter using a fork or a pastry blender until the mixture is coarse and crumbly.
  4.  Slowly stir in the milk.  Do not over mix!  (The original said you might not need the whole cup, but I found that I did and my dough was still a little dry.  Next time, I would probably use a little more than a cup.)
  5. Turn out the dough onto a floured surface and roll out to a thickness of about 1/4 inch.  It doesn't have to be perfect.
  6. Using a knife or pizza cutter, cut the dough into small sections (about 1 to 1 1/2 inches square).  Lay out on a parchment lined baking sheet to dry for about 30 minutes.
  7. Bring the 6 cups of broth to a simmer in a large pan.
  8. Add the dumplings one by one so that they don't stick together.
  9. Cook for 6-7 minutes, stirring often to make sure all of the dumplings cook evenly.
  10. Add the shredded chicken to the dumplings.  Continue cooking for about 20 minutes.  The mixture will thicken up quite a bit.
  11. Salt and pepper to taste and serve!
I hope you enjoy this lovely cold-weather meal!  Yummy yummy!

Friday, December 20, 2013

I {Heart} Italian Food

Italian food is by far my favorite!  I would pretty much eat pasta every day of my life if I could.  My mom has always fixed some great Italian meals growing up.  But, by far, stuffed shells is my favorite meal that my mom has ever fixed.

These stuffed shells and meatballs were, with only a few exceptions, the dishes I requested every time my mom asked me for dinner preferences.  We've eaten this for almost every one of my birthday dinners that I've had at home.  I love it so much!  To me, this meal is perfect.  Just perfect.

It makes a TON of shells and meatballs, so I usually half each recipe.  But this time I made the full batches for a dinner party and still had plenty to freeze for later!  Both the shells and meatballs freeze wonderfully so that you can save some for a super easy meal later.  For the shells, I highly recommend flash freezing them seam side up on a parchment lined cookie sheet before putting them into a freezer bag to store.  They're much more likely to stick together, lose their shape, and cause problems when thawing if you just freeze them right in a bag.

Stuffed Shells
From: My mom (yet again!)
Makes: about 3 dozen shells

Ingredients:
16 ounces jumbo shells (give or take, you're always going to have some break while boiling)
8 ounces shredded mozzarella cheese
1/3 cup dried Italian bread crumbs
1 teaspoon salt
2 cups ricotta cheese
2 cups cottage cheese
2 eggs
1/4 cup parsley
1/2 cup parmesan cheese
1 large jar of spaghetti sauce

Directions:
  1. Preheat oven to 350 degrees.
  2. Boil shells as directed on the package; drain.
  3. Mix all other ingredients, except sauce, in a large bowl.
  4. Stuff filling into shells and place seam-side down in a greased baking dish.
  5. (Freeze shells at this point if you want to save them for later.)
  6. Spoon sauce generously over shells.
  7. Bake for 30 minutes.
  8. If desired, sprinkle with more mozzarella cheese and return to oven for 1-2 minutes to melt cheese.

Meatballs
From: My mom
Makes: about 4 dozen

Ingredients: 
1 pound ground beef
1 pound Italian sausage
1/2 cup milk
2 beaten eggs
1 1/2 to 2 cups Italian bread crumbs
1/4 cup chopped onion
1 teaspoon salt

Directions:
  1. Combine eggs, milk, onion, and salt in a large bowl.
  2. Add enough breadcrumbs to make a ball.
  3. Add meat and mix well.  Beware, the best way to do this is with your hands, but they will get really, really cold!
  4. Roll into 1 inch balls.
  5. Place in a skillet and brown slowly, stirring often.
  6. Drain on paper towels.
  7. (Freeze at this point if saving.)
  8. Place in a greased baking dish and cover with sauce.
  9. Heat in the oven while the stuffed shells are cooking.

Like I said, this meal is divine!  It's perfect with a fresh, green salad and some homemade bread.  Woohoo!  I'm having leftovers for lunch again today, and my mouth is watering just thinking about it!

Tuesday, December 17, 2013

Chicken Noodle Soup

Alright!  I made it with the recipe today!  I know, just barely, but it still counts.

Here's a great winter recipe from my mother!  Wonderfully, it was actually a little cool outside when I made this last Thursday!
I have gotten several compliments on how good this is.  I think that's because it's a creamier soup.  By no means watery.  It's nice and thick and delicious!

Here are a few of the things I love about this recipe.  It's so quick and easy!  It doesn't take any weird ingredients; I usually have everything in the house needed to make it.  You can also add some veggies if you like things like carrots, onion, or celery in your soup.   You could even use all whole foods to make it if you wanted by making your own cream of chicken soup, noodles, etc.  It's just so easy!!!
Chicken Noodle Soup
From: My Mom
Servings: 6-8ish depending on how big of a bowl you serve out
Note: The soup pictured was actually made with shredded turkey, so that's why it looks pink.

Ingredients:
1 quart water
3 1/4 cups uncooked wide egg noodles
4 chicken bouillon cubes
1 can cream of chicken soup
1 1/2 cups cooked, shredded chicken
1/2 cup sour cream
Parsley

Directions:
  1. Bring water and bouillon to a boil in a large sauce pan.
  2. Add noodles, and cook for 10 minutes.  Do not drain.
  3. Add soup and chicken; stir and heat through.
  4. Remove from heat; stir in sour cream.
  5. Sprinkle with parsley.  Salt and pepper to taste.
That's it!  You have a great dinner on the table.  I know it's simple, but I also just love serving this with cool buttered bread.  The contrast of the cool bread and butter with the hot soup is so yummy!  Enjoy!

Saturday, December 7, 2013

Chicken Pot Pie

Hey hey!!!  A new recipe!  It's been so long!

Anyways, this here is my mom's chicken pot pie recipe.  It's super easy to make and only has to bake for about 10 minutes!  

The photos you see are just a little different than the recipe.  I decided to make a smaller version because we really just don't need that many leftovers.  Usually, my mom just puts the crust on top of the dish, but for this one, I decided to line the pie pan with crust and a little bit on top too.   However, I really didn't love the crust to filling ratio.  Overall, I prefer just having the crust on top, but you can always change it up to make it your own.

I also made this one with turkey left over from Thanksgiving instead of chicken!  It's just so versatile!  Lol.
Chicken Pot Pie
Adapted from: My Momma

Ingredients:
+/- 10 oz. frozen mixed vegetables (I use a package that has carrots, corn, green beans, and peas in it.)
1/2 cup chopped onion (I usually omit this.)
1/4 cup margarine
1/3 cup flour
3 cups cooked, shredded chicken
1/2 teaspoon salt
1/4 teaspoon sage
1/8 teaspoon pepper
2 chicken bouillon cubes
2 cups water
3/4 cup milk
1 Pie crust  *recipe below

Directions:
  1. Cook the vegetables in salted water.  Drain and set aside.
  2. While vegetables are cooking, melt margarine in a large sauce pan.
  3. Cook onion in the butter.
  4. Add flour, salt, sage, and pepper into sauce pan and stir to combine.
  5. Pour in the milk, water, bouillon cubes, and stir until thick.
  6. Add drained vegetables and chicken; stir to combine.
  7. Pour into a 7x11 or 9x9 casserole dish.
  8. Cover with pie crust, and cut off the edges.
  9. Bake at 450 degrees for about 10-12 minutes or until crust starts to look dry and browns just slightly.
Pie Crust:
1 1/4 cups flour
1/2 teaspoon salt
1/3 cup hard Crisco
3-4 tablespoons water
  1. Stir together flour and salt in a mixing bowl.
  2. Cut in Crisco until crumbly.
  3. Add water.  Start with 3 tablespoons and then add more as needed until the dough comes together.
  4. Roll out the dough on a slightly floured surface.
I hope you enjoy!  This is a regular at my house, and the leftovers are delicious too!

Wednesday, November 13, 2013

Ranch Chicken Pockets {Wednesday Wins}

Ok... so I've felt so bad that I haven't blogged any recipes in a while that I thought you should get two in a row!  Also, today's recipe really is a win!  Every time I tell Thomas that we're having these chicken pockets for dinner, he just about drools.  We love them so much, and they're incredibly easy!  Lots of times, I stir up the filling earlier in the day or even the night before so that it's super quick to just toss everything together at dinner time!  We usually eat these with a green veggie for a simple and delicious meal!

Ranch Chicken Pockets
Adapted from: Will Cook for Smiles
Makes: 8 pockets

Ingredients:
1 can of crescent rolls (8 rolls)
1-2 cups chicken, cooked and shredded
1 packet Hidden Valley Ranch seasoning mix
3-5 ounces cream cheese
1/4 shredded cheese (I use cheddar)

Directions:
  1. Preheat oven to 375 degrees.
  2. In a mixing bowl, stir together the chicken, ranch seasoning, cream cheese, and shredded cheese.  (To make sure I'm really happy with the consistency and taste, I start with the smaller amounts listed (about) and taste and add more if I want to tweak it.  We really like the creaminess, so I may add a little extra cream cheese.)
  3. Spread the crescent roll dough out and separate into 8 individual rolls.  Spoon chicken mixture onto each roll, then seal each roll completely.  (They may not look very pretty, but make sure they're sealed.)
  4. Place on an ungreased cookie sheet.  Bake for 10-12 minutes, or until the rolls start to brown nicely.
  5. Eat and enjoy!
This meal is so simple and quick.   I hope you enjoy it!

Saturday, October 26, 2013

Mom's Lasagna

Hello hello!  Today I'm going to share yet another recipe from my family cookbook.  This is another one of my mom's.  Also, Thomas is always up for lasagna.  Everytime I give him a choice between lasagna and something else or just tell him that that's what we're having for dinner, he gets really excited.

One of the things I love about lasagna is that you can customize it really easily.  Sometimes I make it with ground beef or Italian sausage, and sometimes I'll go meatless.  You can easily adjust it to make any size pan so you can feed a couple or a crowd.  And you can always use your favorite brand of sauce or mix it up with some different Italian cheeses.  It's so easy to play around with so that you get slightly different results each time.
But, as always, the worst part about making lasagna is actually making it!  The layers take some time (especially because I tend to be a perfectionist), but other than that, it's a great meal that is also delicious for leftovers.

As you'll see in the directions, my mom has a specific way of layering everything.
Noodles first...
Then sauce (she adds the ricotta on top of the sauce, but mine always turns out with big lumps of ricotta in some places, so I mix the ricotta and sauce together and add it in one layer)...
Then both mozzarella and parmesan cheeses...
And repeat until you're finished!  I usually do about 4 layers, but it's really up to you and how thick/thin your layers are, the height of your pan, when you run out of ingredients, etc.
As you can see from the photos, I made my lasagna in a 9x5 pan this time.  I didn't want a whole pan of it in the fridge for the next week (that is waaaay too many leftovers for me), so I made two loaf pans and stuck one in the freezer for some other time.

Mom's Lasagna
From: my Mom!
Makes: a 9x9 pan, 7x11 pan, or two 9x5 pans

Ingredients:
12-15 lasagna noodles
1 lb. ground beef or Italian sausage (or you can also omit)
12 ounces mozzarella (or other Italian) cheese
15 oz. tub ricotta cheese
Regular sized jar of pasta sauce
Parmesan cheese

Directions:
  1. Cook lasagna noodles as directed on package.  Drain to dry.
  2. Brown meat in a skillet and drain (if including meat).
  3. Add pasta sauce and ricotta cheese to meat and stir to combine.  (You can also add some spices if you like.  My mom likes to add oregano, and I usually throw in an Italian seasoning blend that I have.)
  4. Layer ingredients in an ungreased pan in this order: noodles, sauce mixture, mozzarella cheese, parmesan.
  5. Repeat until your pan is full or you run out of something.
  6. Bake at 375 degrees for about 45 minutes.
Serve this up with a fresh salad and some Mess Up Bread, and you've got a delicious homemade meal!  Enjoy!

Tuesday, October 8, 2013

"Mess Up" Bread

So, here is the homemade bread recipe I've been DYING to blog.  Yesterday I had to make it way before dinner (woohoo band practice in the middle of the afternoon), so I had the time and frame of mind to photograph some of the steps.

This recipe also comes from the lovely cookbook my mommy made me (which I explained here).  But it also has even more of a back-story.  At one point when I was growing up, Mom got a bread machine.  And she used it a ton.  Seriously, unless you're just really having a bad day and you want to pound on some dough for a while, the bread machine is totally the way to go!  It basically does all the work for you, and then you get to put a delicious loaf of homemade bread on the table with literally NO work!  Anyway, one time, she accidentally set the bread maker on the "Dough" setting (which means that the machine will knead the dough and let it rise but won't bake it), and the trouble with the bread maker was that you couldn't start it in the middle of a cycle just for bake.  So Mom had bread dough but had to figure out how to finish it off to make it into bread.  So, she did her kitchen magic, and that night for dinner we had "Mess Up" bread.  Since then, it's been one of our favorite breads.  It is her (and my) go-to homemade bread for just about any meal.  And we've also never renamed it.  So, to this day when she's taking meal requests, she'll still ask us, 'do you want mess up bread with that?'

This bread is similar to a French bread loaf.  It's not authentic in that the crust is not super crunchy, but it has a French bread flavor.  It is definitely a bit of a chore to make if you don't have a bread machine, but if you do have one, you have got to try this bread!  I usually half everything to make just one loaf, and Thomas and I eat it all week with dinner.  We'll toast it under the broiler with some butter and garlic salt, or dip it in oil and Italian seasonings, or sometimes I even just butter it and stick it in the microwave to heat it back up.  It is sooo good!

If you're using the bread maker, it takes care of all the kneading and the first rise for you, so the first hands on part is when you get the dough out onto a floured surface, shape it into a ball (it's pretty sticky, so you want to just lightly cover it with flour), and then roll it out into a rectangle.  (Or an oval if you're me and can't roll things into rectangles very well.)  Also, you'll see some little specks in my dough because I added some Italian seasoning that's not in the recipe.

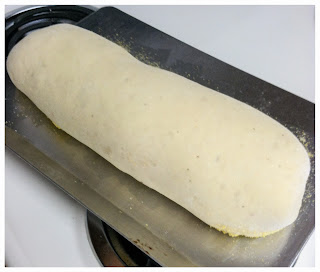
Then just roll it up and place it on your prepared baking sheet, like so.
Then you let it rise for another hour.  I usually set my bread on the stove and preheat my oven at the same time (even though the oven doesn't take that long to preheat) just so that the bread soaks up some of the extra heat.  So here it is ready to pop in the oven.
And once it's baked, it comes out looking beautiful!  It's so fluffy and delicious!

Homemade "Mess Up" Bread
From: My Mother's genius ingenuity in the kitchen!
Makes: 2 loaves
*This recipe also works great when half-ed, and it will make one loaf.

Ingredients:
1 1/2 cups warm water
1 tablespoon margarine, softened
1 tablespoon oil
4 1/4 cups bread flour
1 1/2 tablespoons sugar
1 1/2 teaspoons salt
2 teaspoons yeast

margarine
salt
cornmeal

Directions:
*If you have a bread maker, just put all the ingredients in your bread maker and set for dough.  This should take care of all of the kneading and the first rise, so you can start at step 7.
For those of you that don't have a bread machine:
  1. Add yeast to warm water and stir.
  2. Put 2 cups flour, the salt, and the sugar in a large bowl, add water and yeast; mix thoroughly for 2 minutes.
  3. Add oil and margarine; mix thoroughly for 2 minutes.
  4. Add remaining flour until dough is firm, but still elastic.
  5. Knead on a floured surface for 5 minutes.
  6. Place into a well-greased bowl.  Cover and let rise for 1 hour.
  7. Divide dough in half and roll each half into a rectangle.
  8. Roll the dough up starting at the long side to form two loaves.
  9. Place both rolls on a baking sheet that is greased with margarine and sprinkled with cornmeal and salt.
  10. Cover and let rise for 1 hour.
  11. Bake at 375 degrees for 20-40 minutes until golden brown.  (Baking one loaf in my oven usually takes a little over 20 minutes.)
  12. Let cool slightly before cutting and serving.
This bread is so delicious, seriously... you should make some!  Yummy!